The ANSI virtual terminal allows for advanced console options simply by outputting special characters
(ANSI escape sequences). In the simplest form, this can be used to style the console text to your
liking. For example:
There are three main modes of operation: basic, 256-color, and RGB. Each of these modes has slightly different syntax, though the general format is nearly identical. One consistent trait is that the sequence "\x1b[0m" can be used to reset the styling back to defaults, so it is generally a good idea to place this sequence at the end of any special output you are doing.
| Format | Example | Result |
|---|---|---|
| \x1b[FGm | \x1b[31m | Hello world |
| \x1b[FG;BGm | \x1b[31;32m | Hello world |
| \x1b[AT;FG;BGm | \x1b[1;4;31;30m | Hello world |
Where FG stands for foreground, BG for background, and AT for attribute.
Note that multiple attributes can be used at once by simpling adding multiple attribute codes separated by a semicolon (";").
ANSI Attributes
| Code | Meaning |
|---|---|
| 0 | Reset attributes to default |
| 1 | Bold; typically manifests as a brighter color |
| 2 | Dim; typically manifests as a darker color |
| 3 | Italic |
| 4 | Underline |
| 5 | Blink; slowly flashing text |
| 7 | Reverse; inverts foreground and background color |
| 8 | Hidden; useful for password inputs |
| 9 | Strikethrough |
Available Basic-mode Colors
| Code | Meaning |
|---|---|
| 0 | Reset to default |
| 30 | Black |
| 31 | Red |
| 32 | Green |
| 33 | Yellow |
| 34 | Blue |
| 35 | Magenta |
| 36 | Cyan |
| 37 | Light gray |
| 39 | Default color |
| 90 | Dark gray |
| 91 | Light red |
| 92 | Light green |
| 93 | Light yellow |
| 94 | Light blue |
| 95 | Magenta |
| 96 | Cyan |
| 97 | White |
Note that these are for foreground colors. These exact same colors apply to backgrounds, but you must add 10 to the value. For example, if 31 is for a red foreground, then 41 is for a red background.
You can also achieve more color variety by mixing the BOLD or DIM attribute.
| Format | Example | Result |
|---|---|---|
| \x1b[38;5;FGm | \x1b[38;5;1m | Hello world |
| \x1b[38;5;FG;48;5;BGm | \x1b[38;5;1;48;5;2m | Hello world |
| \x1b[AT;38;5;FG;48;5;BGm | \x1b[4;38;5;132;48;5;16m | Hello world |
Where FG stands for foreground, BG for background, and AT for attribute. FG and BG are expected to be in the range of 1-255
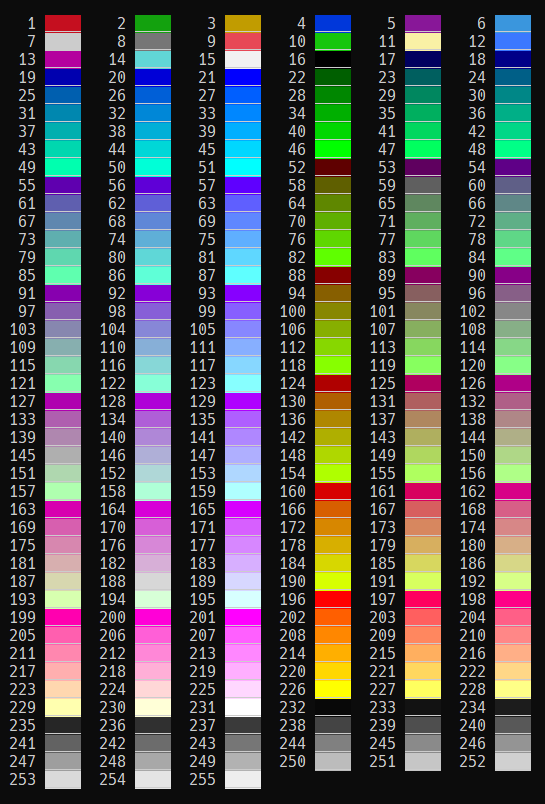
Refer to the below table for color options. Unlike the basic console coloring, the exact same color code applies for both foregrounds and backgrounds.
| Format | Example | Result |
|---|---|---|
| \x1b[38;2;R;G;Bm | \x1b[38;2;255;0;0m | Hello world |
| \x1b[38;2;R;G;B;48;2;R;G;Bm | \x1b[38;2;255;0;0;48;2;0;255;0m | Hello world |
| \x1b[AT;38;2;R;G;B;48;2;R;G;Bm | \x1b[4;38;2;255;128;128;48;2;0;0;0m | Hello world |
Where R, G, and B are for red, green, and blue channels respectively, and AT is for attributes.
Color channels are expected to be in the range of 0-255.
You can also use ANSI escape codes to move the cursor around in the terminal. This allows you to move back to a location to replace the output that is already there.
One use for this would be to create a loading animation, or perhaps a loading bar.
| Code | Example | Meaning |
|---|---|---|
| \x1b[NA | \x1b[1A | Move up N row(s) |
| \x1b[NB | \x1b[2B | Move down N row(s) |
| \x1b[NC | \x1b[1C | Move right N column(s) |
| \x1b[ND | \x1b[3D | Move left N column(s) |
| \x1b[NE | \x1b[1E | Move the cursor to beginning of the line, N lines down |
| \x1b[NF | \x1b[1F | Move the cursor to beginning of the line, N lines up |
| \x1b[NG | \x1b[3G | Move the cursor to cursor column N within the same line |
| \x1b[N;MH | \x1b[3;1H | Move the cursor to cursor column N on row M |
| \x1b[NJ | \x1b[0J | Clear the screen. N=0 clears from cursor to end of screen N=1 clears from cursor to beginning of screen N=2 clears entire screen N=3 Clears entire buffer |
| \x1b[NK | \x1b[0K | Clear the current line. N=0 clears from cursor to end of screen N=1 clears from cursor to beginning of screen N=2 clears entire screen |
| \x1b[s | \x1b[s | "Save" (remember) the current cursor position. |
| \x1b[u | \x1b[u | "Restore" (move to) the last saved cursor position. |
Where N is the number of rows/columns to move.
For example, we can continually move back 1 character and rewrite it with a new character to create a loading animation.
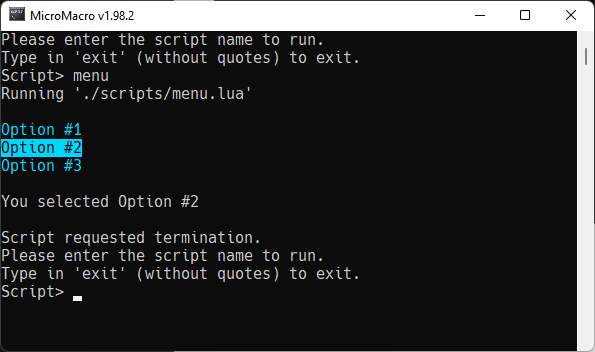
One use of these ANSi escape sequences would be to create a menu system. We can style a selected element with a highlight to make it stand out, and move the cursor to redraw elements whenever something changes.
UP and DOWN keyboard arrow keys can be used to select an element, and the ENTER key can be used to confirm your selection.
The result is that the menu should look something like this:
Page last updated at 2024-04-01 23:43:54